Freeform surface modelling
This article has multiple issues. Please help improve it or discuss these issues on the talk page. (Learn how and when to remove these template messages)
|
Freeform surface modelling is a technique for engineering freeform surfaces with a CAD or CAID system.
The technology has encompassed two main fields. Either creating aesthetic surfaces (class A surfaces) that also perform a function; for example, car bodies and consumer product outer forms, or technical surfaces for components such as gas turbine blades and other fluid dynamic engineering components.
CAD software packages use two basic methods for the creation of surfaces. The first begins with construction curves (splines) from which the 3D surface is then swept (section along guide rail) or meshed (lofted) through.

The second method is direct creation of the surface with manipulation of the surface poles/control points.

From these initially created surfaces, other surfaces are constructed using either derived methods such as offset or angled extensions from surfaces; or via bridging and blending between groups of surfaces.

(animated version)
Surfaces
[edit]Freeform surface, or freeform surfacing, is used in CAD and other computer graphics software to describe the skin of a 3D geometric element. Freeform surfaces do not have rigid radial dimensions, unlike regular surfaces such as planes, cylinders and conic surfaces. They are used to describe forms such as turbine blades, car bodies and boat hulls. Initially developed for the automotive and aerospace industries, freeform surfacing is now widely used in all engineering design disciplines from consumer goods products to ships. Most systems today use nonuniform rational B-spline (NURBS) mathematics[1] to describe the surface forms; however, there are other methods such as Gordon surfaces or Coons surfaces .
The forms of freeform surfaces (and curves) are not stored or defined in CAD software in terms of polynomial equations, but by their poles, degree, and number of patches (segments with spline curves). The degree of a surface determines its mathematical properties, and can be seen as representing the shape by a polynomial with variables to the power of the degree value. For example, a surface with a degree of 1 would be a flat cross section surface. A surface with degree 2 would be curved in one direction, while a degree 3 surface could (but does not necessarily) change once from concave to convex curvature. Some CAD systems use the term order instead of degree. The order of a polynomial is one greater than the degree, and gives the number of coefficients rather than the greatest exponent.

The poles (sometimes known as control points) of a surface define its shape. The natural surface edges are defined by the positions of the first and last poles. (Note that a surface can have trimmed boundaries.) The intermediate poles act like magnets drawing the surface in their direction. The surface does not, however, go through these points. The second and third poles as well as defining shape, respectively determine the start and tangent angles and the curvature. In a single patch surface (Bézier surface), there is one more pole than the degree values of the surface. Surface patches can be merged into a single NURBS surface; at these points are knot lines. The number of knots will determine the influence of the poles on either side and how smooth the transition is. The smoothness between patches, known as continuity, is often referred to in terms of a C value:
- C0: just touching, could have a nick
- C1: tangent, but could have sudden change in curvature
- C2: the patches are curvature continuous to one another
Two more important aspects are the U and V parameters. These are values on the surface ranging from 0 to 1, used in the mathematical definition of the surface and for defining paths on the surface: for example, a trimmed boundary edge. Note that they are not proportionally spaced along the surface. A curve of constant U or constant V is known as an isoperimetric curve, or U (V) line. In CAD systems, surfaces are often displayed with their poles of constant U or constant V values connected together by lines; these are known as control polygons.
Modelling
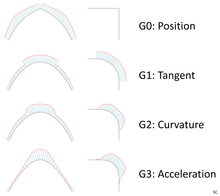
[edit]When defining a form, an important factor is the continuity between surfaces - how smoothly they connect to one another.
One example of where surfacing excels is automotive body panels. Just blending two curved areas of the panel with different radii of curvature together, maintaining tangential continuity (meaning that the blended surface doesn't change direction suddenly, but smoothly) won't be enough. They need to have a continuous rate of curvature change between the two sections, or else their reflections will appear disconnected.
The continuity is defined using the terms:
- G0 – position (touching)
- G1 – tangent (angle)
- G2 – curvature (radius)
- G3 – acceleration (rate of change of curvature)

To achieve a high quality NURBS or Bézier surface, degrees of 5 or greater are generally used.
Freeform surface modelling software
[edit]- Autodesk Alias
- Autodesk Inventor
- Blender
- CATIA (FreeStyle)
- Cobalt
- form•Z
- Fusion 360 (Autodesk)
- ICEMSurf
- KeyCreator
- Onshape
- Siemens NX
- PowerSHAPE
- PTC Creo, formerly ProEngineer ISDX
- PTC Creo Elements/Pro
- Rhinoceros 3D
- SolidWorks
- SolidThinking
- Tebis
See also
[edit]References
[edit]- ^ Metzger, Michael; Eismann, Sabine. "Freeform Surface Modeling" (PDF). hp.com. Retrieved April 15, 2017.
