Vickers hardness test

The Vickers hardness test was developed in 1921 by Robert L. Smith and George E. Sandland at Vickers Ltd as an alternative to the Brinell method to measure the hardness of materials.[1] The Vickers test is often easier to use than other hardness tests since the required calculations are independent of the size of the indenter, and the indenter can be used for all materials irrespective of hardness. The basic principle, as with all common measures of hardness, is to observe a material's ability to resist plastic deformation from a standard source. The Vickers test can be used for all metals and has one of the widest scales among hardness tests. The unit of hardness given by the test is known as the Vickers Pyramid Number (HV) or Diamond Pyramid Hardness (DPH). The hardness number can be converted into units of pascals, but should not be confused with pressure, which uses the same units. The hardness number is determined by the load over the surface area of the indentation and not the area normal to the force, and is therefore not pressure.
Implementation
[edit]


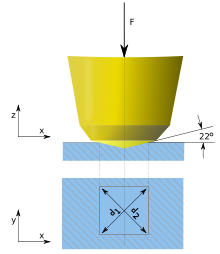
It was decided that the indenter shape should be capable of producing geometrically similar impressions, irrespective of size; the impression should have well-defined points of measurement; and the indenter should have high resistance to self-deformation. A diamond in the form of a square-based pyramid satisfied these conditions. It had been established that the ideal size of a Brinell impression was 3⁄8 of the ball diameter. As two tangents to the circle at the ends of a chord 3d/8 long intersect at 136°, it was decided to use this as the included angle between plane faces of the indenter tip. This gives an angle from each face normal to the horizontal plane normal of 22° on each side. The angle was varied experimentally and it was found that the hardness value obtained on a homogeneous piece of material remained constant, irrespective of load.[2] Accordingly, loads of various magnitudes are applied to a flat surface, depending on the hardness of the material to be measured. The HV number is then determined by the ratio F/A, where F is the force applied to the diamond in kilograms-force and A is the surface area of the resulting indentation in square millimeters.
which can be approximated by evaluating the sine term to give,
where d is the average length of the diagonal left by the indenter in millimeters. Hence,[3]
- ,
where F is in kgf and d is in millimeters.
The corresponding unit of HV is then the kilogram-force per square millimeter (kgf/mm2) or HV number. In the above equation, F could be in N and d in mm, giving HV in the SI unit of MPa. To calculate Vickers hardness number (VHN) using SI units one needs to convert the force applied from newtons to kilogram-force by dividing by 9.806 65 (standard gravity). This leads to the following equation:[4]
where F is in N and d is in millimeters. A common error is that the above formula to calculate the HV number does not result in a number with the unit newton per square millimeter (N/mm2), but results directly in the Vickers hardness number (usually given without units), which is in fact one kilogram-force per square millimeter (1 kgf/mm2).
Vickers hardness numbers are reported as xxxHVyy, e.g. 440HV30, or xxxHVyy/zz if duration of force differs from 10 s to 15 s, e.g. 440HV30/20, where:
- 440 is the hardness number,
- HV names the hardness scale (Vickers),
- 30 indicates the load used in kgf.
- 20 indicates the loading time if it differs from 10 s to 15 s
| Material | Value |
|---|---|
| 316L stainless steel | 140HV30 |
| 347L stainless steel | 180HV30 |
| Carbon steel | 55–120HV5 |
| Iron | 30–80HV5 |
| Martensite | 1000HV |
| Diamond | 10000HV |
Precautions
[edit]When doing the hardness tests, the minimum distance between indentations and the distance from the indentation to the edge of the specimen must be taken into account to avoid interaction between the work-hardened regions and effects of the edge. These minimum distances are different for ISO 6507-1 and ASTM E384 standards.
| Standard | Distance between indentations | Distance from the center of the indentation to the edge of the specimen |
|---|---|---|
| ISO 6507-1 | > 3·d for steel and copper alloys and > 6·d for light metals | 2.5·d for steel and copper alloys and > 3·d for light metals |
| ASTM E384 | 2.5·d | 2.5·d |
Vickers values are generally independent of the test force: they will come out the same for 500 gf and 50 kgf, as long as the force is at least 200 gf.[6] However, lower load indents often display a dependence of hardness on indent depth known as the indentation size effect (ISE).[7] Small indent sizes will also have microstructure-dependent hardness values.
For thin samples indentation depth can be an issue due to substrate effects. As a rule of thumb the sample thickness should be kept greater than 2.5 times the indent diameter. Alternatively indent depth, , can be calculated according to:
Conversion to SI units
[edit]To convert the Vickers hardness number to SI units the hardness number in kilograms-force per square millimeter (kgf/mm2) has to be multiplied with the standard gravity, , to get the hardness in MPa (N/mm2) and furthermore divided by 1000 to get the hardness in GPa.
Vickers hardness can also be converted to an SI hardness based on the projected area of the indent rather than the surface area. The projected area, , is defined as the following for a Vickers indenter geometry:[8]
This hardness is sometimes referred to as the mean contact area or Meyer hardness, and ideally can be directly compared with other hardness tests also defined using projected area. Care must be used when comparing other hardness tests due to various size scale factors which can impact the measured hardness.
Estimating tensile strength
[edit]If HV is first expressed in N/mm2 (MPa), or otherwise by converting from kgf/mm2, then the tensile strength (in MPa) of the material can be approximated as σu ≈ HV/c , where c is a constant determined by yield strength, Poisson's ratio, work-hardening exponent and geometrical factors – usually ranging between 2 and 4.[9] In other words, if HV is expressed in N/mm2 (i.e. in MPa) then the tensile strength (in MPa) ≈ HV/3. This empirical law depends variably on the work-hardening behavior of the material.[10]
Application
[edit]The fin attachment pins and sleeves in the Convair 580 airliner were specified by the aircraft manufacturer to be hardened to a Vickers Hardness specification of 390HV5, the '5' meaning five kiloponds. However, on the aircraft flying Partnair Flight 394 the pins were later found to have been replaced with sub-standard parts, leading to rapid wear and finally loss of the aircraft. On examination, accident investigators found that the sub-standard pins had a hardness value of only some 200–230HV5.[11]
See also
[edit]References
[edit]- ^ R.L. Smith & G.E. Sandland, "An Accurate Method of Determining the Hardness of Metals, with Particular Reference to Those of a High Degree of Hardness," Proceedings of the Institution of Mechanical Engineers, Vol. I, 1922, p 623–641.
- ^ The Vickers Hardness Testing Machine. UKcalibrations.co.uk. Retrieved on 2016-06-03.
- ^ ASTM E384-10e2
- ^ ISO 6507-1:2005(E)
- ^ Smithells Metals Reference Book, 8th Edition, ch. 22
- ^ Vickers Test Archived 21 October 2014 at the Wayback Machine. Instron website.
- ^ Nix, William D.; Gao, Huajian (1 March 1998). "Indentation size effects in crystalline materials: A law for strain gradient plasticity". Journal of the Mechanics and Physics of Solids. 46 (3): 411–425. Bibcode:1998JMPSo..46..411N. doi:10.1016/S0022-5096(97)00086-0. ISSN 0022-5096.
- ^ Fischer-Cripps, Anthony C. (2007). Introduction to contact mechanics (2nd ed.). New York: Springer. pp. 212–213. ISBN 9780387681887. OCLC 187014877.
- ^ "Hardness". matter.org.uk.
- ^ Zhang, P. (September 2011). "General relationship between strength and hardness". Materials Science and Engineering A. 529: 62. doi:10.1016/j.msea.2011.08.061.
- ^ Report on the Convair 340/580 LN-PAA aircraft accident North of Hirtshals, Denmark on September 8, 1989 | aibn. Aibn.no. Retrieved on 2016-06-03.
Further reading
[edit]- Meyers and Chawla (1999). "Section 3.8". Mechanical Behavior of Materials. Prentice Hall, Inc.
- ASTM E92: Standard method for Vickers hardness of metallic materials (withdrawn and replaced by E384-10e2)
- ASTM E384: Standard Test Method for Knoop and Vickers Hardness of Materials
- ISO 6507-1: Metallic materials – Vickers hardness test – Part 1: Test method
- ISO 6507-2: Metallic materials – Vickers hardness test – Part 2: Verification and calibration of testing machines
- ISO 6507-3: Metallic materials – Vickers hardness test – Part 3: Calibration of reference blocks
- ISO 6507-4: Metallic materials – Vickers hardness test – Part 4: Tables of hardness values
- ISO 18265: Metallic materials – Conversion of Hardness Values
External links
[edit]- Video on the Vickers hardness test
- Vickers hardness test
- Conversion table – Vickers, Brinell, and Rockwell scales


![{\displaystyle \mathrm {HV} ={\frac {F}{A}}\approx {\frac {1.8544F}{d^{2}}}\quad [{\textrm {kgf/mm}}^{2}]}](https://wikimedia.org/api/rest_v1/media/math/render/svg/cc819001758dfce6de350df89b0121fc50df94fb)
![{\displaystyle \mathrm {HV} \approx {0.1891}{\frac {F}{d^{2}}}\quad [{\textrm {N/mm}}^{2}],}](https://wikimedia.org/api/rest_v1/media/math/render/svg/ecd1f1d735e72ceef8c8f78468c502eb3aa7550c)


